http://www.righto.com/2009/08/multi-protocol-infrared-remote-library.html
Showing posts with label Electronics. Show all posts
Showing posts with label Electronics. Show all posts
Friday, January 9, 2015

Tuesday, September 25, 2012
Thursday, August 16, 2012
HobbyKing R/C Hobby Store :
HobbyKing R/C Hobby Store :
Well known site for buying RC products. Most prefered from RC enthugiast. Very populor for low cost shipping, avilability of different brands RC products and timly and quality deliveries.
Well known site for buying RC products. Most prefered from RC enthugiast. Very populor for low cost shipping, avilability of different brands RC products and timly and quality deliveries.
Friday, August 3, 2012
Tuesday, July 24, 2012
Using android sensors
Very good article on using android sensors.
http://www.ibm.com/developerworks/opensource/library/os-android-sensor/index.html
http://www.ibm.com/developerworks/opensource/library/os-android-sensor/index.html
Friday, July 20, 2012
Thursday, January 5, 2012
Tuesday, March 29, 2011
Bicycle computer / Speedometer
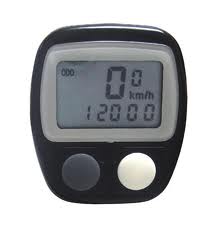 Many of 2 wheelers (Motor cycles) we drive in India comes with speedometer. But isn’t it cool idea to have speedometer to your bicycle also.
There are many digital speedometer are available now. These also comes with many functions , like Speed, top speed , trip meter , average speed etc..
Very basic instrument that I am using comes with following features which I feel sufficient for hobbyist.
Ø SPD - Current Speed of bicycle
Ø ODO - ODOMeter (Total Distance)
Ø DST - Trip Distance
Ø MXS - Maximum Speed
Ø AVS- Average Speed
Ø TM - Elapsed Time
Ø RPM - Rotation per minute
Ø CLK - Clock (12H/24H)
Ø SCAN - (Icon)
Ø "Up" / "Down" Comparator (Down arrow shows speed less that average speed and vice varsa for up)
Ø Setting Speed Scale (km/h,m/h)
Ø Setting Tire Circumference (60CM-229CM) : This is primary setting you need to do while installing speedometer. Feed the circumference of bicycle wheel.
Ø Setting the last value of ODOMeter
Ø Auto On/Off
Ø Auto On/Off

Installation:
On ordering or by purchasing you will get one speedometer, magnet, sensor, and battery and instruction manual.
Installation is very easy:
Step 1: Put the battery inside computer and close the lid, observe the lid it contains small rubber washer to it. This will provide somewhat resistance to water.
Step 2: Input the circumference of your wheel for my MTB it’s 209. Here left button of computer work as mode and right button works as counter just like you set any digital watch.
Step 3: Set as per your requirement Miles/Hr or Km/Hr I prefer Km/Hr as it’s very common in India.
Step 4: Set current time in 24 hour format or in 12 hour
Your computer setting is done! Now sensor.
Step 5: Take the magnet and fit it to spoke of wheel facing to fork of the cycle.
Step 6: Fit the sensor to the fork as such that it will face to magnet attached to spoke. Make sure that distance between the magnet and sensor is 2-3 millimeters only.
Step 7: Attach computer on holder of sensor, Check any speed recording you are getting on computer by moving wheel forward and backward, if not readjust the sensor and magnet until you get some reading on computer.
Step 8: If you are getting some reading then it’s time to fix the computer on handlebar and take real test drive! Cheers!!
Step 9: Validate the accuracy. Easy way to do this try to cover same distance from your bicycle and motorcycle and by car. If the distance mismatches adjust circumference accordingly. (You will have to remove and re-install the battery to do this.)
The bicycle computer attaches to the mounting shoe by sliding the unit it snaps firmly into position. So you can easily unplug it and keep it with you if park your cycle somewhere.
Tuesday, August 31, 2010
RC Helicopter.
About RC Helicopter.
RC Helicopters are Radio Controlled helicopters. It can be control from certain range say 50m or 100m depending on the trans-receiver circuit.
History
My younger brother give me two fuselage of broken helicopter and ask me to do something with it.
So I combined both to build one working one. Tail and receiver was broken of first so get it replaced from another one.
Transmiter PCB was broken after soldering some broken paths and replacing couple of registor it start reponding.
Below are the pics of completed assembly. While first flight test transmiter is powered by my cars battery.
Watch this helicopter in action here.
Some Pictures
Assembled helicopter : 12V power suply from cars battrey :


RC Helicopters are Radio Controlled helicopters. It can be control from certain range say 50m or 100m depending on the trans-receiver circuit.
History
My younger brother give me two fuselage of broken helicopter and ask me to do something with it.
So I combined both to build one working one. Tail and receiver was broken of first so get it replaced from another one.
Transmiter PCB was broken after soldering some broken paths and replacing couple of registor it start reponding.
Below are the pics of completed assembly. While first flight test transmiter is powered by my cars battery.
Watch this helicopter in action here.
Some Pictures
Assembled helicopter : 12V power suply from cars battrey :


Subscribe to:
Posts (Atom)